Jaxon`s CFS2 Tips & Tricks
Version 2006_01_29
I am playing this sim now nearly since the release and mainly like it because of the enormous potential to enhance it.
So here I am going to share my knowledge with you.
Well, at first you probably want to add another aircraft, or just a "skin", so let`s start with the Aircrafts:
Adding Additional Aircraft |
I) Just another skin for an already existing aircraft |
This one is easy, there are two ways. A) 
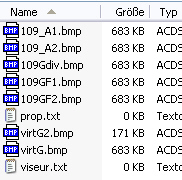
In the *.zip file are textures to replace the ones your plane is using now. So you only need to move them into the aircrafts texture folder and overwrite the old textures - that is all. But now your original skin is gone, and if this wasn`t planned, you need another way: Make a COPY of the entire old aircraft folder and rename it after your
needs. 
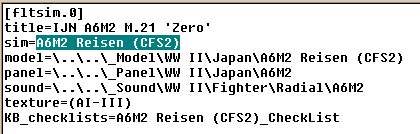
Now you need to change the name of the new plane to recognize it in the freeflight menu. Open the Aircraft.cfg inside the planes folder and change the line after title=NEW NAME (I recommend to use the same name like the folder). That is all. B) A smarter way is to make just a copy of the texture folder inside the old aircraft and rename it, for example like this:
You can add additional information of the content after the DOT. In this case I have renamed the old texture folder, too. Now you need to add the new skin to your aircraft.cfg.
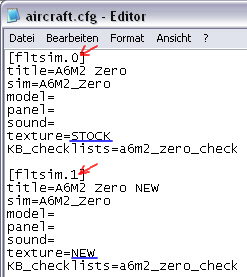
Change the number in [fltsim.X]
to the next number and add the additional information of your texture folder You can do this when the game is running, but the new plane will first be complete playable with weapons and such after a restart of the game. The method B) is smarter, but you can`t use the
planes in missions anymore, not even the first one. See also the Folder-Management part for more information
|
II) A complete new ADDON aircraft |
Unzip the *.zip to a dummy folder of choice. 
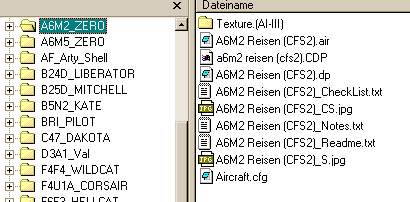
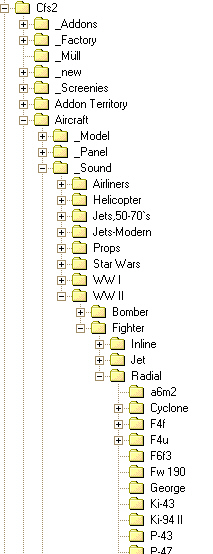
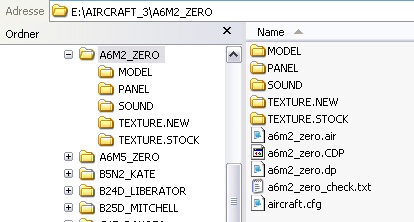
In there are probably these four folders: MODEL, ...and also, the "softfiles", as I like to call them : The aircraft.cfg *.air (-file) and *.dp ( ?damage-protocol?-file) containing information about damages and loadouts.
Often dowloaded planes
are complete with own panel and sound. Move the new aircraft folder into your CFS2/AIRCRAFT folder and restart the game. You should be able to see the new plane in the freeflight menu. If not, see I) - III) of the next topic. Also watch out for
misspellings !! Please note also, that there is a plane limit somewhere around hundred
planes installed (Probably depending on your system specs) Happy flying !! |
Using FS2000,FS2002 and FS2004 planes in CFS2 | |
Here are the five
main problems, and how to correct them. (They don`t appear always and I have listed them in order of importance, so you can follow step by step, when a new installed plane does not work) |
|
Problem |
Solution |
I) Missing panel and sound Often dowloaded planes are complete with own panel and sound. If not, they often alias panel and/or sound to other planes` files, which are not part of CFS2. You have to check this at all new planes.
|
This one is easy, there are three solutions: A) Get the plane, they are aliasing to and include it into your CFS2 folder. B) Copy a working panel and/or sound folder to your plane, either full folders, or these from planes aliasing to existing planes. C) The Professional way: See the folder management part below.
|
II) Not suiting airfile Especially some FS2004 and some CFS2 AI planes can`t be accessed via the freeflight-menu, due to missing information for player use in the airfile.
|
A)
First a temporary solution:
Get an *.air file from a plane that is flyable and rename it to the original
airfile. (Make a copy of the original first)
|
III) Missing *.dp file Your plane needs the CFS specific *.dp file (damage protocol?), containing information about possible damages, armament and loadouts. Note: The plane will start for a freeflight ride without this file, but the game will crash to desktop (CTD), when the A/C is destroyed.
|
A) First a temporary solution: Copy a *.dp file from an existing plane into
your new planes folder and rename the file with the name of the airfile.. (You can check the name in the aircraft.cfg, too: It is the name appearing after sim=.....) B) Make an own suiting *.dp file for this plane. |
IV) Wrong format of modelfile CFS2 cannot read the modelfile. (Mainly of FS2004 and some FS2002 planes) |
You need 2 programs to easily convert Fs2004 models to CFS 2:
1. mdlc_b85 by
Ivan Hsu 2. mk_mdlc_v2 by Morten Here are my prefered settings which should work as a start:
The shining model settings give a nice, semiglossy look of the surface. You can play with all boxes, but make sure the Hide Dos MDLC window is unselected or the program will hang up. At last, save the converted file as a modelfile. You can replace the existing file,or for example, save the converted file of the
F4U7.mdl from above as
F4U7_CFS2.mdl. |
V) Alphachannel Congratulation, if you have this problem, I guess you have already seen your plane in the game, so you are near the end ! Some textures feature additonal information for a shining effect saved in the so called alphachannel of the texture. CFS2 can handel these textures, but back when CFS2 came out, the alphachannel was used for defining the opaque-status of the texture, while the shining was defined inside the model. M$ changed this in FS2002/4 in that way, that the opaque status is
defined in the model and the information for the surface-shining comes with
the texture. (reason is, you can show small shiny things like blank rivets
etc. this way) |
Get the DXT-program by Martin Wright: http://www.mnwright.btinternet.co.uk/index.htm
The information is saved in the "alphachannel", a greyscale pic of your
texture. (You can see the actual alpha in the right upper corner) =>Alpha So these parts of your texture with this
color will be
black in your alpha and later transparent in your game. => Right: Complete white, just as wanted ! Now you have to save your texture with the new alpha again: =>File Now a preselection window appears. ------ Additional information:
I suggest to play a bit with this nice
tool.
|
VI) unshined models |
Shine them !! Here is a link to my simple tutorial (Hope to find some more time to make that site better, but al the info is there) |
VII) Crashing to Desktop (CTD) in AI
use Some converted FS9 planes will result in a CTD, when used
by AI. |
A discovery by DBolt: You need to remove the "g_lightStates"
variable from the DICT section of the mdl. - First, locate the DICT section, close of the CFS2 tag. 9d e9 f0 57 23 05 9c 4e bc b6 12 bb 2f e7 3f 06 That is the "g_lightStates" ID number. Just replace the bites with
zeros. Don't be tempted to remove the data, as it will mess up the mdl. |
Additional Tips for dealing with aircrafts | |
Texture hierarchy (using the same texture for different planes) | |
CFS2 uses a special hierachy when handling textures. Out of the box, Microsoft has placed the proptextures for all planes there for example. How to use this feature? A) I copy all textures that are often appearing on multiple
planes into the main folder, such as propellers, but also general files like
interiour textures of planes, of which I have more than five different
liveries (skins) in my hangar. See example:
Please note, that the size of the textfile is not to mention. All my Bf 109s from Paul Rebuffat (From which is the
example pic) will now ALL use the same textures in the main folder. B) If you want a plane to use another texture, spend this one an own bmp in its own texture
folder. I recommend this technique for the use of the prewar-style-bmp, too and save it just to the plane that should wear it. You can use similar for Addon-Scenery etc. => Keep your game slim and tidy !!!
|
|
Folder Management (linking to other files) | |
To get rid of multiple same files, I use this way to handle them. |
|
First the aircrafts See the Stock-Zero as example: I have renamed the files to show what they are for and where their origin is, because it is easier for me to keep track within the thousands of planes I have installed. This does not result in error-messages like removing/renaming the folders of the stock planes. In there are just the
Aircraft.cfg and the "soft files" as I like to call them. WOW, where are the other folders (Model/Panel/Sound), you think? |
|
Well, watch the ZERO`s Aircraft.cfg :
the CYAN-coloured line defines
the name of the files in the The TEXTURE-line is refering to the texture folder inside the ZERO-folder with the extension (AI-III) (What are just the tailmarkings of this skin) Please notice the dot in the folders name ! It is possible to add different skins to just one Aircraft folder this way (like in FS200X) and copy the lines you see in the pic above just below these lines and change the [flightsim.X] to the next number, but for missions you need only one Aircraft per folder.
|
![]() |
Sorry for having started at the end with the textures, but now I explain how I have linked the model, panel and sound. For example take a look at the sound-line. By default the sound entry in the Aircraft.cfg reads sound= In this case, the game will search for the file sound.cfg in the aircraft`s sound-folder. From this default location I have linked the game away to search at the new location using DOS-commands: sound=\..\..\_Sound\WW II\Fighter\Radial\A6M2 " \.. " means one folder-hierarchy up/back We are now out of the sound-folder and back in the A6M2_Zero-folder. " \.. " again for another step back. We are now in the CFS2-root/Aircraft-folder. From here we can follow the path down again to the new location of the sound folder, named A6M2, in which the needed sound.cfg and the soundfiles are to find. I keep my plane-related files
inside my Aircraft folder. _Model The bottomline " _ " in the name is just to let Windows list them at the beginning, like you can see at right Well, that is it ! All sound files tidy together and only one time in the game. If you want to use the same sound on another plane, only the line needs to be copied to the new planes Aircraft.cfg
|
![]() |
Adding scenery | ||
OK, now your
virtual sky is coloured enough from all the kites you have installed? So, let`s go to add some scenery. |
||
How scenery works | ||
Out of the box, your CFS2
game offers the whole world, just like the civilian Flight-Simulator series. The CFS2 idea of the world is generaly just a virtual big ball as basis. But the ball is still round, so we need another type of files, the "Mesh", giving height datas to have some hills and valleys. Now come the airfields, these have an own groundtexture, normally a flattened surface and some runway data, so you can choose it in the freeflight menu as well as in the mission builder. The additional items, huts, trees hangars etc. you see there, are part of
the GSL, the Global-Scenery-Layer. Addon scenery FS-style uses undestroyable macros showing hangars and houses and are part of the sceneries *.bgl files
|
||
How to add scenery | ||
Scenery comes, like most addons,
packed in a *.zip file. Unzip it to a dummy folder of choice. In there is now probably A scenery folder a texture folder, with the needed textures Name the folder in a suiting way, for example ETO_Germany and move
it to place of choice. Start the game, go to the scenery menu and add the new folder by browsing to its place on your drive. Shut down the game and start it again !! Addon scenery is very basic stuff, thats needs to be located by CFS2
during start-up. |
||
The scenery.cfg | ||
To keep track, I recommend to put your addon files in separate folders. You can see at right, that I have put the addon vehicles by WOLFI in a subfolder of the stock scendb/veh folder. The Wolfi folder contains its own scenery and texture folder.
|
|
|
It is possible to link this way to every place on your drive outside
your game. Even linking to other drives is possible. As you can see at right, I have an own drive (F:\) for all my addon scenery. For very basic stuff like weapons and vehicles and such, make sure to
put them early in the ranking of the scenery.cfg |
|
Effects | ||
Adding Life | ||
Have you ever wondered why there are so less (no!) people to see on the ground? => They are all busy in my factory: At least it seems so, due to the smokestacks ! I came across this when I saw a FS2002 scenery addon called "FS2002 Chicago area smoke effects" awhile ago. I tried to use the effect on the infrastructures, but no luck as it seemed first. The reason: With a little wind they look much realistic. If you want, you can try this with other objects, like the single smokestack or the little stonebuilding, which has a chimney, too. You can get the original or: http://www.fscorner.com/database2002-1/08-01-2002.htm Just copy the file into the effects-folder |
This is no download, you only need to add the following lines to your inf_small_factory_bldgc.dp -file in your CFS2-root/objectsdp-folder. Where in there is unimportant, I have put them at the end.
(Caution: You can notice, that I use renamed files, to keep the
smokestack-effect-files next to each other, you can do the same or put the
original filename there, you can also take the smokestacks from the ships
(or every other effect).
|
© Jaxon 2005